So, why do we take fine art photographs and what are they?
Everyone will have their own interpretation - to me, "fine art" photographs are images that are not record shots or family shots or holidays snapshots - in other words images where composition, aesthetics, message etc are considered consciously by the artist or the viewer.
So why take them? I think there are a few reasons:
1) Self expression and artistic outlet.
2) Charting ones own progress as a photographer
3) Creation of art
4) Gaining recognition and/or noteriety
5) Sharing our view of the world
6) Provoking thought/getting our message across.
7) Money (ha!)
8) Provision of an aesthetic.
To me the most important reason is to allow an artistic outpouring of creativity that is missing in my life otherwise. I do also write poetry but it is truly awful, far too embaressing to publish and makes the Vogons look like Wordsworth. If no-one else ever saw my images I would get just as much joy from taking them and using them to remember the fun I had in the process of taking them.
Having said that, I like my ego to be massaged, I like to be flattered and most importantly I like to feel that I am learning, so I enter competitions, lap up any praise and try to improve based on the critiques I get. I measure my success by the marks and positions I am given. Of course if I don't do well, then the judge is obviously new to this and not a particularly bright fellow.
And of course, if I could turn a couple of bob from it all that would be grand too. After all photography is an expensive business, equipment costs a bomb, software is rediculously expensive and even printing costs a fair bit when you go above A4 (And pictures always look a lot better at A3 - even snaps become fine art if you print them big enough!) So how do you make money from your fine art? There are plenty of sales sites on the Web, but it's just not that simple. There are too many! Why should someone find your image instead of mine?
Like anything in sales, it comes down to marketing. You have to get your images out there and in everyones face! Recently I stumbled across one of the many blogs run by "1 Green Thumb". This is a dude with a plan! He has lots of tips and hints on how to turn your hobby into a little cash and offset the costs of some of those lenses. My take on his message is that you snag viewers (potential customers) and boost your rankings by connecting to lots of websites through holding many of your own. You interconnect your websites and form a trawling net and point the whole lot at your main sales vehicle.
It all seesm to make sense to me, but being only partially able at techy computery things, and having been scared to dip my toe in the water in the past I'm still a little daunted. But, I've been inspired and so I am following his plan. This blog is the first step, the second step is to build myself a free web page - here is mine so far "AndyMacDs Images of Scotland", which I am aiming to complete next month in January 2010. Then it's on to a Flickr account, Adsense and so on.
I'll keep you posted on how I get on. In fact once I'm up and running I'll keep a tally on this blog of how much cash I make. Let's see, what have I spent on photography so far... probably about £2500-£3000. So I'm 3 Grand down at the start. I might have to sell a lot of images and get you guys to click the Adsense banners an awful lot! Who knows, in time, it may become a multipound industry. But for now (and for tax purposes) it'll stay strictly a hobbyist income to help with my materials.
Monday, 14 December 2009
Tuesday, 8 December 2009
A Fair Weather Photographer
So what weather do you like to go shooting in?
Most people think a bright summers day with blue skies is ideal, and it does provide great bright light to freeze action shots, but...
Recently I went to a talk by one of the Paisley Colour exponents - Robert Fulton. Robert is simply excellent at landscapes - he not only is compositionally spot on, but he also has the gumsheon to get up early for morning shots, is technically excellent, and is willing to stand up to the welly tops in icy cold rivers for a shot of a frozen tree as viewed by the ducks (which are at this point huddled together on dry land).
The point is, Robert never shoots on summers days. In the summer he is pottering in his garden enjoying the sunshine. His cam era is resting in his kit bag. He only photographs in the autumn and winter. He takes most of his images on cold frosty or misty mornings when the sun is struggling to get through the cloud, colours are strong but subtle and the light is diffuse. As a result he takes incredibly atmospheric images. My own best shots are taken up the hills when no-one is there , between storms, when the sky is black and the sun is low and lighting the foreground.
I was lucky enough to have a chat with Robert and to my delight discovered that not only does he have the same gear as me (unusually NOT shooting with a full frame sensor) but he also takes the images that I aim for wonderfully well, uses photoshop with the same ethos that I do and seeks out his subjects in much the same way I do in the location that I had earmarked for the coming years' photography. He certainly gave me something to aim at! On discussing his set up for landscapes I found out that our work flow is almost identical - almost...
We both shoot in aperture mode almost exclusively, using a tripod and preferring the 2 second delay to the fuss of a remote release, we both use hyperfocal depth of field, we both use polarisers and warm up filters and we both post process by masking areas and playing with exposure, shadow/highlight and contrast to bring selective areas of our images up or down.
So what were the differences? That is aside from his skill, eye and experience:
1) I tend to use f/11 or so to reduce chromatic aberation at the expense of sharpness in the distance. Robert said "What's chromatic aberation, I don't bother worrying about that - use f/22. play around with your digital camera and compare the results, see what works for you". Well, f/22 here I come - the huge difference between his images and mine was the critical sharpness at a distance.
2) I'm an evening person, taking most of my landscapes at dusk, conversely Robert gets up early (only shooting in the autumn and winter due to the later sunrises), drives for an hour or so to his favourite spots and then waits for the sun to start to come up. The result, soft colours, golden glows and atmospheric mists on cold morning (no doubt he also suffers a lot of dissappointing wasted trips, but we won't dwell on those). Mist is Roberts trademark and he makes GREAT use of it.
3) Finally, I wait for my shot, take the image and move on. Robert tends to bracket his exposures, rattle off a few shots, wait for the light to change and do it again. He gets lots of similar images and is able to choose the best from a batch of quality images.
So I got what I hoped for from his talk, and more - tips, inspiration and best of all I learned something that was directly relevant to my own photography. I learned that I need to strat getting up earlier in the morning and I learned that "bad" weather is the landscape photographers friend.
Most people think a bright summers day with blue skies is ideal, and it does provide great bright light to freeze action shots, but...
Recently I went to a talk by one of the Paisley Colour exponents - Robert Fulton. Robert is simply excellent at landscapes - he not only is compositionally spot on, but he also has the gumsheon to get up early for morning shots, is technically excellent, and is willing to stand up to the welly tops in icy cold rivers for a shot of a frozen tree as viewed by the ducks (which are at this point huddled together on dry land).
The point is, Robert never shoots on summers days. In the summer he is pottering in his garden enjoying the sunshine. His cam
 era is resting in his kit bag. He only photographs in the autumn and winter. He takes most of his images on cold frosty or misty mornings when the sun is struggling to get through the cloud, colours are strong but subtle and the light is diffuse. As a result he takes incredibly atmospheric images. My own best shots are taken up the hills when no-one is there , between storms, when the sky is black and the sun is low and lighting the foreground.
I was lucky enough to have a chat with Robert and to my delight discovered that not only does he have the same gear as me (unusually NOT shooting with a full frame sensor) but he also takes the images that I aim for wonderfully well, uses photoshop with the same ethos that I do and seeks out his subjects in much the same way I do in the location that I had earmarked for the coming years' photography. He certainly gave me something to aim at! On discussing his set up for landscapes I found out that our work flow is almost identical - almost...
We both shoot in aperture mode almost exclusively, using a tripod and preferring the 2 second delay to the fuss of a remote release, we both use hyperfocal depth of field, we both use polarisers and warm up filters and we both post process by masking areas and playing with exposure, shadow/highlight and contrast to bring selective areas of our images up or down.
So what were the differences? That is aside from his skill, eye and experience:
1) I tend to use f/11 or so to reduce chromatic aberation at the expense of sharpness in the distance. Robert said "What's chromatic aberation, I don't bother worrying about that - use f/22. play around with your digital camera and compare the results, see what works for you". Well, f/22 here I come - the huge difference between his images and mine was the critical sharpness at a distance.
2) I'm an evening person, taking most of my landscapes at dusk, conversely Robert gets up early (only shooting in the autumn and winter due to the later sunrises), drives for an hour or so to his favourite spots and then waits for the sun to start to come up. The result, soft colours, golden glows and atmospheric mists on cold morning (no doubt he also suffers a lot of dissappointing wasted trips, but we won't dwell on those). Mist is Roberts trademark and he makes GREAT use of it.
3) Finally, I wait for my shot, take the image and move on. Robert tends to bracket his exposures, rattle off a few shots, wait for the light to change and do it again. He gets lots of similar images and is able to choose the best from a batch of quality images.
So I got what I hoped for from his talk, and more - tips, inspiration and best of all I learned something that was directly relevant to my own photography. I learned that I need to strat getting up earlier in the morning and I learned that "bad" weather is the landscape photographers friend.
Tuesday, 10 November 2009
Charitable Togging
Every year my daughters school does a fund raising event where kids parents and teachers travel to the Edinburgh International Climbing Arena and scare themselves silly going over the aerial assualt course, 100 feet above the arena's stone floor. It's a terrifying accomplishment for many of them - every year someone decides to confront their fear of heights and give it a go.
Last year I went along to support friends, took my camera along and snapped away for fun. The pictures came out OK and I ended up sticking them on a CD and giving them to the school, license free. I figured that they could use the images to advertise for future years fund raising or, because I had been careful to get a picture of everyone who did the course, they could charge a couple of pounds per image and make a little more money. In fact the school has a projector an for a few days after the event they projected my images on a conutinual cycle for the kids to see as they moved between classes, which went down well with them.
This year however I approached the event with a little more trepedition - daughter #1 had decided to give it a go. I spent a sleepless night worrying about her and picturing her falling off. Still, she was mad keen, so off we set on Sunday to the arena. Happily there were no falls, alt.jpg) hough there were tears from some but everyone made it round. I found out that instead of charging for my images last year, the school had emailed my images out to all the participants - no charge (which was an opportunity missed for them) and no acknowledgement of the photographer (which was an opportunity missed for me). So my charitable gesture of providing a free photography service and licence free images, was neither exploited or recognised - shame.
hough there were tears from some but everyone made it round. I found out that instead of charging for my images last year, the school had emailed my images out to all the participants - no charge (which was an opportunity missed for them) and no acknowledgement of the photographer (which was an opportunity missed for me). So my charitable gesture of providing a free photography service and licence free images, was neither exploited or recognised - shame.
This year however I approached the event with a little more trepedition - daughter #1 had decided to give it a go. I spent a sleepless night worrying about her and picturing her falling off. Still, she was mad keen, so off we set on Sunday to the arena. Happily there were no falls, alt
.jpg) hough there were tears from some but everyone made it round. I found out that instead of charging for my images last year, the school had emailed my images out to all the participants - no charge (which was an opportunity missed for them) and no acknowledgement of the photographer (which was an opportunity missed for me). So my charitable gesture of providing a free photography service and licence free images, was neither exploited or recognised - shame.
hough there were tears from some but everyone made it round. I found out that instead of charging for my images last year, the school had emailed my images out to all the participants - no charge (which was an opportunity missed for them) and no acknowledgement of the photographer (which was an opportunity missed for me). So my charitable gesture of providing a free photography service and licence free images, was neither exploited or recognised - shame.So... having taken the images again this year, I considered adopting a different approach. Giving the school 72ppi low quality images with my PBASE web address added at the bottom and then adding the images to my website with an option to purchase the full size prints for a fee (most of the proceeds to the school, and a small amount to cover costs to me.) I considered it..., but fell at my usual hurdle. I love taking images but I can't be bothered putting in the work to turn a buck. Lazy boy.
So the question is, if you are able to turn a thing you love into a job, by turning it into a job do you lose the love?... Should I try to pursue a career that could turn me off the thing I am passionate about?
For now, I'm happy to keep enjoying the photography and I assume that once I am good enough to satisfy myself (and I'm a hard task master!), I won't have to try too hard to actually sell my images. I may be dreaming :-) but at least I'm enjoying myself!
Monday, 26 October 2009
23rd Oct - Another Hike in the Wilderness, Or is that a swim?
For months I have been talking about getting up to Glen Coe and the Rannoch Moor for some landscape photography, and what better time than late October when the hills are ablaze with autumn colour. I'll tell you when is better, it's better when it is not continually raining!
At the last minute I booked a hotel "20 minutes from the Rannoch moor" (turned out to be 40 - bah!) that had a cancellation policy that meant I could cancel up to 24 hours ahead if the weather was too bad. 26 hours ahead, the forecast was great...22 hours ahead, solid sheets of rain were all that was predicted. In fact Northern Scotland was in the grip of some really terrible storms, people were drowned in rural areas. So... I was in two minds, cancel and lose the price of the hotel or just go up and at least get to know the landscape and the routes for another time.
Off I went with an impressive array of waterproofs, driving up in remarkably dry weather on Friday. At the Trossachs the rain started. On I went and by the time I got to the Rannoch moor it was wall to wall grey, windscreen wipers at double speed and the only thing keeping my spirits up was the feast of chocolate and crisps that I had brought with me.
I stopped at Rannoch, got into my rain gear and had a wee hike about on the moor in the rain. My camera was in it's rain proof bag, I set up the tripod in the rain and held my golf umbrella above it while I juggled the camera, lenses and filters into position to take...a washed out driech photae of some bog... still I had at least learned that photos could be taken from under an umbrella without the camera getting wet. One of the blogs I had read before I went suggested that you should put a condom over the camera leaving the lens sticking out! I was awful glad that I found the "umbrella method" to be sufficient.
On I went and found myself at the foot of the Buchaille Etive Mor. That mountain that every Scottish landscaper must take a picture of. It looked good, with just a wee whisp of cloud around the summit. Quickly I got the tripod out, the umbrella and the camera bag, looked around, and the Buchaille had gone! Now, you might think it difficult for a mountain to disappear, with or without Mohammad summoning it, but the Buchaille has a sense of humour (as I was to find out). It was hiding behind dense cloud, just a wee edge playfully keeking out. Little did I know that in 3 wet rainy days, this would be the best view I would get. There was no time for paying attention to foreground interest, just focus and snap..jpg)
I finished the daylight hours in Glen Coe, with the last of the light, under an umbrella, trying unsuccessfully to get images of the 3 sisters, then it was off to my (really basic!) basic hotel for an awful curry and 2 welcome pints of Guinness while I sat down with an unabridged Mr Defoe and read all about Robinson Crusoe's 28 years of hardship. Kind of cool reading words written 300 years ago over a pint :-) while out on my own adventures. At least Robinson got some decent weather!
.jpg) I was up early on Saturday, 50 mins before dawn and driving through the dark, very conscious of the threat of deer jumping out at the car. I've hit a deer up there before and it's a truly scary experience. I just made it into position at the foot of the Buchaille for dawn, bereft of any breakfast and guess what... bereft of any Buchaille! The cloud was LOOOOOOOW!. Of course it was only low around that damned mountain, snickering away at me from behind it's petticoats. Glen Etive on the other hand looked brighter than anywhere and I decided to make in that direction. Off I went and caught some dawn light and dry weather looking down the glen. Lovely. I spent the next 90 minutes driving from passing place to passing place snapping river and mountain landscapes with some real joy in my heart and a rumbling in my stomach, which was speaking to me. "Bacon butty" it kept saying, but when you get the light, everything else has to go by the wayside. Up and down the glen I went, having a ball,
I was up early on Saturday, 50 mins before dawn and driving through the dark, very conscious of the threat of deer jumping out at the car. I've hit a deer up there before and it's a truly scary experience. I just made it into position at the foot of the Buchaille for dawn, bereft of any breakfast and guess what... bereft of any Buchaille! The cloud was LOOOOOOOW!. Of course it was only low around that damned mountain, snickering away at me from behind it's petticoats. Glen Etive on the other hand looked brighter than anywhere and I decided to make in that direction. Off I went and caught some dawn light and dry weather looking down the glen. Lovely. I spent the next 90 minutes driving from passing place to passing place snapping river and mountain landscapes with some real joy in my heart and a rumbling in my stomach, which was speaking to me. "Bacon butty" it kept saying, but when you get the light, everything else has to go by the wayside. Up and down the glen I went, having a ball, .jpg) till finally the rain came on again. As I made my way back I say a bunch of canoeists start putting their kayaks in the river. But it was raining, are they mad, they'll get wet!!!! Ahem... the folly of that thought struck me. I couldn't pass up their bright canoes and the chance of some action shots, I changed to a 70mm prime lens, jumped out the car and held the camera under my coat. Off I scrambled through the canoe club members, nodding and smiling and pushing myself to the front, scrambling over the rocks and getting myself a prime spot down stream to watch them plunge through the white water and waterfalls. as each one came down , I whisked the camera out, took a grab shot with autofocus and
till finally the rain came on again. As I made my way back I say a bunch of canoeists start putting their kayaks in the river. But it was raining, are they mad, they'll get wet!!!! Ahem... the folly of that thought struck me. I couldn't pass up their bright canoes and the chance of some action shots, I changed to a 70mm prime lens, jumped out the car and held the camera under my coat. Off I scrambled through the canoe club members, nodding and smiling and pushing myself to the front, scrambling over the rocks and getting myself a prime spot down stream to watch them plunge through the white water and waterfalls. as each one came down , I whisked the camera out, took a grab shot with autofocus and .jpg) thrust the camera back under my coat again. A successful approach in the end! This looks like exactly the sort of minority sport photography that could give you great images, given the scenery and the action!
thrust the camera back under my coat again. A successful approach in the end! This looks like exactly the sort of minority sport photography that could give you great images, given the scenery and the action!
But that was it, the rain was on steadily now and the first set of falls was conquered. Back in to the car for another drive about, scouting out the lay of the land for my next trip here. But first of to the Kingshouse hotel, the oldest inn in Scotland, where the English troops lodged before the Glen Coe massacre of the MacDonalds back in 1692. Whatever the murky past held, they do a damn fine steak and ale pie and chips now.... yum! spent lunch time in the climbers bar in Mr Defoe's company again. I could get used to living like this! The rain wasn't abating however so off I went for a tootle about. I ended up just above Glen Coe again, having a biscuits and crisps picnic"dessert" in the heaviest rain. Finally with just 2 or 3 hours of daylight left I though I had to get out and about. On top of the thermals, jeans, t-shirt, jumper and fleece, on went my water proof jacket, my spats, hiking boots and waterproof trousers. I was prepared for the hills and the weather! Into the boot went the camera and off I went up the nearest hill. It was only light rain by now so the walking was cool, although the path had become a hill drainage run off and had turned into a 1cm deep waterfall, all the way up. But on I went until after only half a mile I was faced with the first ford - stepping stones across a gentle waterfall. Except... the waterfall was raging and the stepping stones were submerged. With a 50meter tumbling drop down the hillside and as no-one knew where I was, discretion was the better part of valour and I about turned. as I walked back down the hill, the rain stopped! For 3 minutes and 30 seconds... and I didn't have my camera... bah!
I got back to the car and sensing this was my last chance, headed for Glen Coe proper. I got the tripod and umbrella out and clambered down the side of the glen to the valley floor to take pics of the 3 sisters, and they actually turned out OK, although conditions were difficult. Having said that there was a 6 minutes spell of dry weather as I was scrambling down. Here's an example of a shot in the rain..jpg)
So that was it. I went back to the hotel via Morrisons to grab a pot noodle (yes that was better than the hotel food!) and a bottle of wine and settled in for an early night. The clocks went back that night for the end of British Summer Time so I was up the next day at 5:30am and off to the Buchaille again in the most torrential rain and 75mph gusts of wind. As I parked on the Rannoch Moor, I could actually see the japester this time, but there was NO chance of getting the camera out long enough for a shot. I sat in the car with it rocking in the wind and had to admit defeat. So off I drove for a quick trip down Glen Etive again. What a change in 24 hours! The river was nearly bursting it's banks, the road was flooded, waterfalls were pouring down over it - Armageddon! I sat and watched the river rise where the canoeists had been, by over a foot inside a minute and I began to get a bit nervous. There is only one road in or out of the glen. So a hurired 3 point turn (actually 7 point) in the tiny passing places followed and off I charged back up the glen through the water on the road and out of there as fast as I could. I made quick time back to West Lothian, the rain stopping at the Trossachs (hmmm... there might be a lesson there) and starting again back in West Lothian (of course). Home by 9:45am , just as the kids were getting up for the day, I was able to have a nice home cooked breakfast again.
So what have I learned? You CAN take pictures in the rain, it's just more of a fiddle. Glen Coe and Glen Etive are well worth another trip in good weather. And I'll be staying at the Kingshouse (haunted or not) next time.
Oh, and that blinking Buchaille hasn't won yet - I'll be back!
At the last minute I booked a hotel "20 minutes from the Rannoch moor" (turned out to be 40 - bah!) that had a cancellation policy that meant I could cancel up to 24 hours ahead if the weather was too bad. 26 hours ahead, the forecast was great...22 hours ahead, solid sheets of rain were all that was predicted. In fact Northern Scotland was in the grip of some really terrible storms, people were drowned in rural areas. So... I was in two minds, cancel and lose the price of the hotel or just go up and at least get to know the landscape and the routes for another time.
Off I went with an impressive array of waterproofs, driving up in remarkably dry weather on Friday. At the Trossachs the rain started. On I went and by the time I got to the Rannoch moor it was wall to wall grey, windscreen wipers at double speed and the only thing keeping my spirits up was the feast of chocolate and crisps that I had brought with me.
I stopped at Rannoch, got into my rain gear and had a wee hike about on the moor in the rain. My camera was in it's rain proof bag, I set up the tripod in the rain and held my golf umbrella above it while I juggled the camera, lenses and filters into position to take...a washed out driech photae of some bog... still I had at least learned that photos could be taken from under an umbrella without the camera getting wet. One of the blogs I had read before I went suggested that you should put a condom over the camera leaving the lens sticking out! I was awful glad that I found the "umbrella method" to be sufficient.
On I went and found myself at the foot of the Buchaille Etive Mor. That mountain that every Scottish landscaper must take a picture of. It looked good, with just a wee whisp of cloud around the summit. Quickly I got the tripod out, the umbrella and the camera bag, looked around, and the Buchaille had gone! Now, you might think it difficult for a mountain to disappear, with or without Mohammad summoning it, but the Buchaille has a sense of humour (as I was to find out). It was hiding behind dense cloud, just a wee edge playfully keeking out. Little did I know that in 3 wet rainy days, this would be the best view I would get. There was no time for paying attention to foreground interest, just focus and snap.
I finished the daylight hours in Glen Coe, with the last of the light, under an umbrella, trying unsuccessfully to get images of the 3 sisters, then it was off to my (really basic!) basic hotel for an awful curry and 2 welcome pints of Guinness while I sat down with an unabridged Mr Defoe and read all about Robinson Crusoe's 28 years of hardship. Kind of cool reading words written 300 years ago over a pint :-) while out on my own adventures. At least Robinson got some decent weather!
.jpg) I was up early on Saturday, 50 mins before dawn and driving through the dark, very conscious of the threat of deer jumping out at the car. I've hit a deer up there before and it's a truly scary experience. I just made it into position at the foot of the Buchaille for dawn, bereft of any breakfast and guess what... bereft of any Buchaille! The cloud was LOOOOOOOW!. Of course it was only low around that damned mountain, snickering away at me from behind it's petticoats. Glen Etive on the other hand looked brighter than anywhere and I decided to make in that direction. Off I went and caught some dawn light and dry weather looking down the glen. Lovely. I spent the next 90 minutes driving from passing place to passing place snapping river and mountain landscapes with some real joy in my heart and a rumbling in my stomach, which was speaking to me. "Bacon butty" it kept saying, but when you get the light, everything else has to go by the wayside. Up and down the glen I went, having a ball, till finally the rain came on again. As I made my way back I say a bunch of canoeists start putting their kayaks in the river. But it was raining, are they mad, they'll get wet!!!! Ahem... the folly of that thought struck me. I couldn't pass up their bright canoes and the chance of some action shots, I changed to a 70mm prime lens, jumped out the car and held the camera under my coat. Off I scrambled through the canoe club members, nodding and smiling and pushing myself to the front, scrambling over the rocks and getting myself a prime spot down stream to watch them plunge through the white water and waterfalls. as each one came down , I whisked the camera out, took a grab shot with autofocus and
I was up early on Saturday, 50 mins before dawn and driving through the dark, very conscious of the threat of deer jumping out at the car. I've hit a deer up there before and it's a truly scary experience. I just made it into position at the foot of the Buchaille for dawn, bereft of any breakfast and guess what... bereft of any Buchaille! The cloud was LOOOOOOOW!. Of course it was only low around that damned mountain, snickering away at me from behind it's petticoats. Glen Etive on the other hand looked brighter than anywhere and I decided to make in that direction. Off I went and caught some dawn light and dry weather looking down the glen. Lovely. I spent the next 90 minutes driving from passing place to passing place snapping river and mountain landscapes with some real joy in my heart and a rumbling in my stomach, which was speaking to me. "Bacon butty" it kept saying, but when you get the light, everything else has to go by the wayside. Up and down the glen I went, having a ball, till finally the rain came on again. As I made my way back I say a bunch of canoeists start putting their kayaks in the river. But it was raining, are they mad, they'll get wet!!!! Ahem... the folly of that thought struck me. I couldn't pass up their bright canoes and the chance of some action shots, I changed to a 70mm prime lens, jumped out the car and held the camera under my coat. Off I scrambled through the canoe club members, nodding and smiling and pushing myself to the front, scrambling over the rocks and getting myself a prime spot down stream to watch them plunge through the white water and waterfalls. as each one came down , I whisked the camera out, took a grab shot with autofocus and .jpg) thrust the camera back under my coat again. A successful approach in the end! This looks like exactly the sort of minority sport photography that could give you great images, given the scenery and the action!
thrust the camera back under my coat again. A successful approach in the end! This looks like exactly the sort of minority sport photography that could give you great images, given the scenery and the action!But that was it, the rain was on steadily now and the first set of falls was conquered. Back in to the car for another drive about, scouting out the lay of the land for my next trip here. But first of to the Kingshouse hotel, the oldest inn in Scotland, where the English troops lodged before the Glen Coe massacre of the MacDonalds back in 1692. Whatever the murky past held, they do a damn fine steak and ale pie and chips now.... yum! spent lunch time in the climbers bar in Mr Defoe's company again. I could get used to living like this! The rain wasn't abating however so off I went for a tootle about. I ended up just above Glen Coe again, having a biscuits and crisps picnic"dessert" in the heaviest rain. Finally with just 2 or 3 hours of daylight left I though I had to get out and about. On top of the thermals, jeans, t-shirt, jumper and fleece, on went my water proof jacket, my spats, hiking boots and waterproof trousers. I was prepared for the hills and the weather! Into the boot went the camera and off I went up the nearest hill. It was only light rain by now so the walking was cool, although the path had become a hill drainage run off and had turned into a 1cm deep waterfall, all the way up. But on I went until after only half a mile I was faced with the first ford - stepping stones across a gentle waterfall. Except... the waterfall was raging and the stepping stones were submerged. With a 50meter tumbling drop down the hillside and as no-one knew where I was, discretion was the better part of valour and I about turned. as I walked back down the hill, the rain stopped! For 3 minutes and 30 seconds... and I didn't have my camera... bah!
I got back to the car and sensing this was my last chance, headed for Glen Coe proper. I got the tripod and umbrella out and clambered down the side of the glen to the valley floor to take pics of the 3 sisters, and they actually turned out OK, although conditions were difficult. Having said that there was a 6 minutes spell of dry weather as I was scrambling down. Here's an example of a shot in the rain.
.jpg)
So that was it. I went back to the hotel via Morrisons to grab a pot noodle (yes that was better than the hotel food!) and a bottle of wine and settled in for an early night. The clocks went back that night for the end of British Summer Time so I was up the next day at 5:30am and off to the Buchaille again in the most torrential rain and 75mph gusts of wind. As I parked on the Rannoch Moor, I could actually see the japester this time, but there was NO chance of getting the camera out long enough for a shot. I sat in the car with it rocking in the wind and had to admit defeat. So off I drove for a quick trip down Glen Etive again. What a change in 24 hours! The river was nearly bursting it's banks, the road was flooded, waterfalls were pouring down over it - Armageddon! I sat and watched the river rise where the canoeists had been, by over a foot inside a minute and I began to get a bit nervous. There is only one road in or out of the glen. So a hurired 3 point turn (actually 7 point) in the tiny passing places followed and off I charged back up the glen through the water on the road and out of there as fast as I could. I made quick time back to West Lothian, the rain stopping at the Trossachs (hmmm... there might be a lesson there) and starting again back in West Lothian (of course). Home by 9:45am , just as the kids were getting up for the day, I was able to have a nice home cooked breakfast again.
So what have I learned? You CAN take pictures in the rain, it's just more of a fiddle. Glen Coe and Glen Etive are well worth another trip in good weather. And I'll be staying at the Kingshouse (haunted or not) next time.
Oh, and that blinking Buchaille hasn't won yet - I'll be back!
Tuesday, 20 October 2009
Autumnal Colour
So, ever since the hike to Irishman's Loch I've been hankering to get back to the Trossachs, especially Loch Voil. This weekend I decided to get back up there and , fingers crossed, catch some autumnal colour reflected in glassy smooth water. There are two schools of thought in photography - plan, plan, plan or shoot from the hip. Usually I plan like crazy then turn up, go "bah! got it wrong again!" and end up shooting from the hip. I really admire people that plan this sort of thing accurately. A lot of it is about knowing your location, it's seasons how the light hits it etc.
I remembered that Loch Voil had been calm in the summer even though the hills were getting a breeze and figured that it was fairly secluded. With a Metcheck weather forecast of 3mph winds and 9°C I though "perfect", still foliage and glassy Loch, crisp and cool for walking, clear air. Brilliant! So I packed the car:
- Tripod
- 70mm for macro
- wide angle for pano
- medium zoom for flexibility
- 300mm zoom for wildlife
- Cokin ring for filters
- Polarizer filters for the blue skies and to stop water reflections.
- ND grad filter to avoid burned out skies
- Remote release for those ultra sharp images
- Kids to ease my conscience for going off for the day
- Wife to keep the kids out of shot (only joking, she carries stuff too...)
- Picnic
And off we went. It took TB and me over 2 hours last time to get there, after getting stuck in traffic, so I wasn't sure how long it would take now. Turned out happily to be 1hr and 5 mins - fantastic! Right on the doorstep! I can come here as often as I like!
We had just entered the Trossachs when I spotted Loch Lubnaig through the trees - looking glass still! Autumnal trees on the far bank - exactly as planned! Woohoo! "Come on kids, you look stiff, let's stretch our legs...". Parked up in the first car park and unpacked all the gear, pathetically excited about taking a pic. Found a great wee spot, extended the tripod and went to put the camera on it. Now... where was that wee doobry that connects the camera to the tripod? Doh! Firs6t lesson of the day - set up the equipment for a trial shot BEFORE you leave on a long trip, just to make sure you have everything. Swearing fluently in several languages inside, I smiled at the kids and said "silly Daddy!" so shooting handheld today I guess then. Rob Roy lived near here and his motto was "Despite Them" - a sentiment that many famous Scots have called on over the years, it embodies the determination that this country has employed over the centuries. so despite my missing wee doobry (cue Frankie Howard - "stop it, titter ye not") I decided I'd still make a fist of it and adjust to get some good shots. In other words, larger apertures, use hyperfocal depth of field and as fast shutter speeds as I could to minimise the shakes. Also on the plus side, I would take more photo's, have greater flexibility and less to carry. The very first shot was a winner - I've seen images like this from Sweden - the graphic style of the reflected tree trunks, the orange colours showing autumn, the little hut to add interest and focus and the simple colour palette.

Thumbs up to Loch Lubnaig, but this was not the main attraction, and just as well as the wind picked up and the Loch got choppy within a few minutes. Good timing! Back in the car and on to Loch Voil, after stopping off at Rob Roy's grave in Balquhidder t o pay our respects and visit the little kirk.
 o pay our respects and visit the little kirk.
Although the roads had been busy, Loch Voil was very quiet and we were able to park up on a muddy bank (NOT in a passing place - bad form that). A quick word of advice to any visitors to Scotland, the countryside is full of single lane roads. You go fast on the straights and slow into the corners, there are passing places (about one car long) every so many hundred yards and when you see another car coming from a distance, you pull into one (on either side of the road). Use them but NEVER park in a passing place - they are needed to keep the traffic flowing.
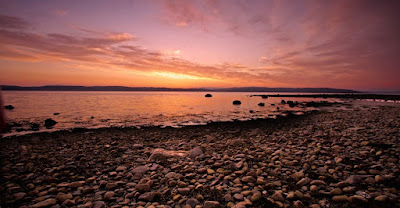
Back to the photography. Out we got, wrapped up warm and went for a toddle along the quiet road alongside Loch Voil. What a place - every few yards I was stopping for another picture, with shingle beaches, trees down to the lochs edge and hills all around, it was extremely photogenic. Here are a few shots from the day.

 So finally my planning had paid off. The water was calm, even though we could hear the wind in the trees at the top of the hills , the sun was fairly low giving a warm glow and although the trees were not quite as orange as I'd hoped they were sufficiently on their way to give great colourful shots. the only thing I got wrong - time of day. An early morning shoot would have bathed the forest on the other bank of the loch in sunshine. All in all though a successful day and I will definitely be returning there soon, either hill walking or photographing (or Both!).
 Saturday, 5 September 2009
HDR - a simple walk through
HDR... tremble, quake. Have you heard of it? It sounds terribly complicated and most beginner photographers I know think this is something far beyond them. Google it and you will find out all about dynamic ranges, optics, RGB, CMYK, computer algorithms and a hundred other big poncy words. Look at the images - some are stunning, most are just plain wierd and apocolyptic looking, overly saturated and almost cartoonised.

HDR is one of my favourite techniques, but it gets a lot of bad press for being "cheating" and is often rediculously overdone. Actually anyone can do it with any digital camera and it is really easy! Here is my quick guide to doing it.
First of all, how does it work,... actually I don't care. If you do, then feel free to bore yourself for hours on the internet without getting any better images. It is NOT a cure all for a lack of talent or patience. In fact to get a good quality HDR image, you really need to be extra careful about composition as you are drawing attention to everything in the image.
So why use it? Very basically, a camera cannot differentiate shadows and highlights like the human eye can, using HDR letes you show up all the detail you could actually see, without worrying about the limitations of your camera. It lets you make very detailed images, correctly exposed at all areas of the image and with as rich or pale colours as you like. Use it when you have no access to filters and there is a strong difference in light between the brightest and darkest parts of the image. The main use is in landscapes.
How do you do it? OK forget all the techy explanations you saw when you were boring yourself on the internet earlier. This is how to do it. Set up your camera on a tripod. You are going to take multiple pictures but the camera MUST not move at all between images. Not even a tiny bit. There's no getting round it, you need tripod and preferably zero to no wind.
- Set up the tripod, compose your image carefully, everything will be visible in the final image so pay attention to everything in the frame, whether it is shadow or not.
- Set a small aperture and focus close by (perhaps even use hyperfocal depth of field). You want everything to be adequately in focus.
- Expose for the mid tones or just let the camera automatically set the exposure
- Lock your exposure and focal setting (you could just use manual for this)
- Digital camears wil allow you to adjust the exposure by 1/3rd of a stop increments to a maximum of 2 stops dark and 2 stops light This is normally represented as the bar across the botton of the viewfinder that looks like \...\...\...\...\...\...\ and is called exposure compensation (look up you camera manual if this is news to you). Set the camera to the darkest of these settings and take the image. It will be pretty black but the brightest highlights will have been captured without being burned out.
- Do NOT move the camera or tripod, but adjust the exposure compensation brighter by 2/3rds of a stop and retake.
- Repeat this until you are at the brightest setting and everyth
 ing is burnt out except the darkest shadows, which should now be exposed well.
 - You should now have 6 or 7 images of varying exposures. Load them to your PC.
- Now you need to use some special but fairly cheap HDR software. I have found Photomatix to be very easy to use. Load all 7 exposures to the software where they will be blended.

You can adjust the relative exposures and contrasts in the software. My tip is to try to make things look natural, do not overdo it or it will be painfully obvious.
That's it you now have an image where EVERY element is exposed correctly, he colours will be fairly rich and you should have a high impact image. Import it to photoshop to carry out any fine tuning, cloning, dodging and burning as necessary, like you would with any image. What makes a great HDR image? Well each to their own, but here is one I think is not overdone but I just could not have done without this technique.
Also remember that while most HDR's tend to be supersaturated, this image technique can be used with muted colours and even mono's - it's about the exposures, not the colours.
It's also a lot of fun - go on, get a free trial of some HDR software and have a go!
Friday, 4 September 2009
Macro - Did you know a fly has hairs betweeen each eye segment - eeuuurghh!
Well I didn't do so well at the portrait competition - only the top 3 were announced, and I didn't place and got no comments back - so I guess it's up to you guys if I am going to get any feedback on these. Never mind, chalk it up to experience.
This weeks NYIP challenge is macro photography. I have a macro lens and I enjoy using it but I'm still at the stage of "Wow! Look how close I can get!" rather than trying to compose fantastic artistic shots - at least I am aware of this however and trying to do something about it. Here is my entry to the competition. I think it holds its own but it got me thinking - what makes a good macro shot?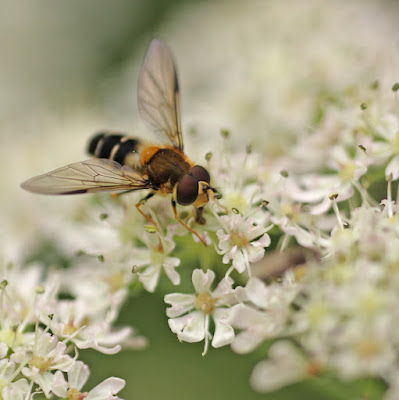
I wish I'd researched this before I entered my competition, but there is what I've learned. First of all, depth of field is all important. You want to blur out the background with some pleasing bokeh but you must keep the subject in focus. Many less accomplished macro toggers (including myself as you can see by this image) use a shallow DoF and end up blurring part of the subject unintentionally (of course some blurring can be good for the more "arty" shots, I actually like the way the attention is brought to the head of this hover fly by lightly blurring the tail). using a wide DoF, by closing the aperture (ie a big numbered "f stop" value) gives stunning images. Check out Mr Plonsky's images for examples of how to do this, without using expensive equipment.
As well as getting the right DoF for your shot, for this type of shot the most important thing is getting the focus bang on, and with absolutely no camera shake. So, how do you do this - simple, use a tripod!...Hang on... by the time my tripod is set up the bee will have flown off (terribly restless critters, bees). Here's my method, I only take macros on well lit days, or I use a flash with a big zoom. Because you are using fast speeds to prevent shake and probably low ISO numbers to preserve the detail, because the light is cut down by your sheer proximity to the subject, and because many people use a long lens close up to help increase the bokeh behind the subject, light is always a difficulty with macro photography. Using flash is problematic, most macro images are taken from inches rather than feet away, so the subject can be washed out by the flash. I tend to stick to bright days. I set the shutter speed as fast as I can (minimum 1/250th if possible on a 70mm prime lens - this is about 3 x faster than you normally need to take a picture hand held with this lens), I set my focus manually (lock it if you like) and then I brace myself as best I can (feet apart like on a surf board, elbows tucked into my chest and stomach, take a breath in and hold it) and make a tiny rocking motion so the subject slides in and out of focus. Half depress the shutter, then I rely on my lightening fast reactions and take many exposures in case I got it wrong. It's a little hit or miss but it means you can move to a new position quickly and follow that bee!
There are other methods for taking images of tricky moving subjects, one's which I have heard of but do NOT approve of, these are killing an insect and then taking it's picture, catching an insect and putting it in the freezer to make it sluggish... there are more sculduggerous methods but frankly, I think they are not only cruel but also cheating. The fun for me is in getting the photograph just right, under difficult conditions.
An alternative method of focussing better is to take multiple exposures and blend them in Photoshop. Just like they said on "Blue Peter", here is one I prepared earlier of a white cross spider. Note that this is from two shots, carefully lined up in Photoshop, one where the head is in focus and the other where the thorax is in focus. It's not perfect but is good enough for web publishing. This is a tricky bit of post processing, personally I find it difficult but you can get software that will blend this for you in a similar method to that of HDR photography. It would probably just have been easier to have used a narrower aperture but I liked the reflection of light to the left, blurred by the narrow DoF.
So that's the technical aspect of macro photography. We've still to cover the artisic nuances. You'll be glad to hear that these differ very little from any other type of snapping. You need to pay attention to the usual rules of composition, simplify, draw attention to the subject and understand what you are taking and what you are trying to achieve. Use rules of thirds, lead in lines etc.
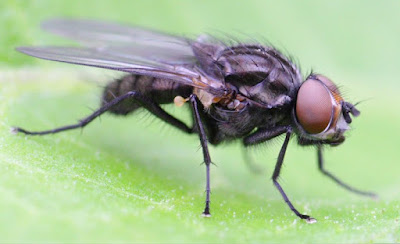
The main thing that macro pics give that others don't is a very unusual angle - a view of something you don't often see. Make use of that. Make the subject the parts of something that are normally invisible to the naked eye - this gives the "Wow!" factor. Did you know that flies have hairs at the the junctions of their compound eyes. I didn't! I had no idea just how hairy flies are!
 Finally, like all photography, telling a story gives an image a memorable hook. How much better would the images above be if say the spider was about to catch the fly! I like my first image here, of the hover fly as it is in context, on a flower and it's "tongue" is actually out in contact with the flower it is sitting on.
So in summary, here are the things that IMHO make a great macro image (and if I ever take one that ticks all the boxes, I'll let you know!):
1. Suitable Depth of Field
2. Pleasing bokeh
3. Pinsharp focus, especially on the eyes.
4. Composition - rules of thirds, leading lines, repeating patterns etc.
5. Attention to the lighting
6. Novelty ie the detail we don't normally see
7. A story.
In other words, many of the things I look for in any photographic medium. The tricky bit in macro photography is that many of these factors have to be that bit more precise and are that bit more difficult to achieve.
If you have not tried macro photography, give it a go. Not only does it open a whole new realm of subject matter but practice at photography with these fine tolerances, with this attention to the technicalities of photography, will make you a more accomplished photographer across the full spectrum of styles and subjects.
Before I close this post - here are some great examples of what can be done - contrary to my examples above you don't HAVE to only take pictures of hairy wee beasties:
25 amazing macro shots
50 more very cool shots
This weeks NYIP challenge is macro photography. I have a macro lens and I enjoy using it but I'm still at the stage of "Wow! Look how close I can get!" rather than trying to compose fantastic artistic shots - at least I am aware of this however and trying to do something about it. Here is my entry to the competition. I think it holds its own but it got me thinking - what makes a good macro shot?

I wish I'd researched this before I entered my competition, but there is what I've learned. First of all, depth of field is all important. You want to blur out the background with some pleasing bokeh but you must keep the subject in focus. Many less accomplished macro toggers (including myself as you can see by this image) use a shallow DoF and end up blurring part of the subject unintentionally (of course some blurring can be good for the more "arty" shots, I actually like the way the attention is brought to the head of this hover fly by lightly blurring the tail). using a wide DoF, by closing the aperture (ie a big numbered "f stop" value) gives stunning images. Check out Mr Plonsky's images for examples of how to do this, without using expensive equipment.
As well as getting the right DoF for your shot, for this type of shot the most important thing is getting the focus bang on, and with absolutely no camera shake. So, how do you do this - simple, use a tripod!...Hang on... by the time my tripod is set up the bee will have flown off (terribly restless critters, bees). Here's my method, I only take macros on well lit days, or I use a flash with a big zoom. Because you are using fast speeds to prevent shake and probably low ISO numbers to preserve the detail, because the light is cut down by your sheer proximity to the subject, and because many people use a long lens close up to help increase the bokeh behind the subject, light is always a difficulty with macro photography. Using flash is problematic, most macro images are taken from inches rather than feet away, so the subject can be washed out by the flash. I tend to stick to bright days. I set the shutter speed as fast as I can (minimum 1/250th if possible on a 70mm prime lens - this is about 3 x faster than you normally need to take a picture hand held with this lens), I set my focus manually (lock it if you like) and then I brace myself as best I can (feet apart like on a surf board, elbows tucked into my chest and stomach, take a breath in and hold it) and make a tiny rocking motion so the subject slides in and out of focus. Half depress the shutter, then I rely on my lightening fast reactions and take many exposures in case I got it wrong. It's a little hit or miss but it means you can move to a new position quickly and follow that bee!
There are other methods for taking images of tricky moving subjects, one's which I have heard of but do NOT approve of, these are killing an insect and then taking it's picture, catching an insect and putting it in the freezer to make it sluggish... there are more sculduggerous methods but frankly, I think they are not only cruel but also cheating. The fun for me is in getting the photograph just right, under difficult conditions.
An alternative method of focussing better is to take multiple exposures and blend them in Photoshop. Just like they said on "Blue Peter", here is one I prepared earlier of a white cross spider.
 Note that this is from two shots, carefully lined up in Photoshop, one where the head is in focus and the other where the thorax is in focus. It's not perfect but is good enough for web publishing. This is a tricky bit of post processing, personally I find it difficult but you can get software that will blend this for you in a similar method to that of HDR photography. It would probably just have been easier to have used a narrower aperture but I liked the reflection of light to the left, blurred by the narrow DoF.
So that's the technical aspect of macro photography. We've still to cover the artisic nuances. You'll be glad to hear that these differ very little from any other type of snapping. You need to pay attention to the usual rules of composition, simplify, draw attention to the subject and understand what you are taking and what you are trying to achieve. Use rules of thirds, lead in lines etc.
The main thing that macro pics give that others don't is a very unusual angle - a view of something you don't often see. Make use of that. Make the subject the parts of something that are normally invisible to the naked eye - this gives the "Wow!" factor. Did you know that flies have hairs at the the junctions of their compound eyes. I didn't! I had no idea just how hairy flies are!
Finally, like all photography, telling a story gives an image a memorable hook. How much better would the images above be if say the spider was about to catch the fly! I like my first image here, of the hover fly as it is in context, on a flower and it's "tongue" is actually out in contact with the flower it is sitting on.So in summary, here are the things that IMHO make a great macro image (and if I ever take one that ticks all the boxes, I'll let you know!):
1. Suitable Depth of Field
2. Pleasing bokeh
3. Pinsharp focus, especially on the eyes.
4. Composition - rules of thirds, leading lines, repeating patterns etc.
5. Attention to the lighting
6. Novelty ie the detail we don't normally see
7. A story.
In other words, many of the things I look for in any photographic medium. The tricky bit in macro photography is that many of these factors have to be that bit more precise and are that bit more difficult to achieve.
If you have not tried macro photography, give it a go. Not only does it open a whole new realm of subject matter but practice at photography with these fine tolerances, with this attention to the technicalities of photography, will make you a more accomplished photographer across the full spectrum of styles and subjects.
Before I close this post - here are some great examples of what can be done - contrary to my examples above you don't HAVE to only take pictures of hairy wee beasties:
25 amazing macro shots
50 more very cool shots
Saturday, 15 August 2009
Portrait Competition
I'll admit it - portraits are NOT my cup of tea. I'm not very good at them and I feel awkward asking people to pose, so I tend to take grab shots only and those are tough to compose well.
This week the NYIP photo challenge is offering a free t-shirt and a chance for your image to appear in one of their excellent a educational podcasts, but the theme is... you guessed it.... portraits. Now, with landscapes I would have been straight in there, but I was struggling with portraits. On looking through my portfolio, I found this one that I had completely forgotten about. as i said, I tend to go for grab shots and so, without the planning and preperation that goes with a landscape image, my portraits tend to slip out of my consciousness rapidly. However, I think I did a good job of this one. This is my (at the time) 6 year old daughter practicing on the piano while my parents-in-law listened and enjoyed the candles on the Christmas tree. I tried to make this a timeless image by converting to black and white and hiding the existing noise from the high ISO exposure by adding to it with more, to make it grainy and just that little bit less modern. I used the keyboard as the anchor of the image and as a lead in line . The way the light fell on the keyboard lets the eye be grabbed by a bright band of light taking you to my dughters hands. From there the reflection of the trees candles on the black keye gives an interesting contrast and leads you through the room and past my parents-in-law (in soft focus - and with their backs to us as they contemplate the tree - they are there for mood and context, not to be the subject) and on to the distinctive but out of focus tree. The idea here is that the viewer appreciates my daughter playing piano as the subject, but the context of a tranquil Christmas period is evident from the grandparents standing close together, and the glow from the tree in the dim lighting. The three key elements necessary to tell this story are practically all that is visible, each element is appropriately exposed and there is little else to distract the eye. altogether I think this was very successful - we shall see what the judges at NYIP say... Have a look at the other entries too, some are of an exceptionally high standard when you consider that all of us there are students on a journey from the basics to becoming better photographers.
Just for completeness, here is another image that I "grabbed" at last years festival. Unfortunately I can't enter it in any competitions or sell the image as I don't have a model release form. This is a very pretty girl who could not have looked more pensive. I t was about 5pm on the last day of the 2008 Edinburgh Festival and I would bet that she is a dancer in one of the shows (after all she was wearing leg warmers Sherlock) - she looked utterly dejected and alone, possibly sad that the excitement of the last few weeks was coming to an end. I was scanning the milling crowds for a good image and my lens happenned to alight on her just as the sun came out for a few seconds and illuminated her perfectly. I reeled off a couple of snaps so that I would not miss the chance and then was able to wait a few seconds without her noticing me till I was able to get this image with all the people crowded round her but passing her by with their backs to her. This really accentuated the mood and makes the image in my opinion.
If you would like to see anymore of my Fringe Festival images, please have a browse at my PBase Fringe gallery. I wonder what this years will bring.
My conclusion from these two images, my two most successful "portraits", is that a portrait must tell a story or evoke an emotion - I see so many portraits of cute kids and beautiful girls but so often, they are just "record" shots, posed and perfect and essentially boooooringggg. For me a good portrait is almost a foray into photo journalism. We shall see if I have the courage to take the final step into that most risky and scary of all photography genres...
This week the NYIP photo challenge is offering a free t-shirt and a chance for your image to appear in one of their excellent a educational podcasts, but the theme is... you guessed it.... portraits. Now, with landscapes I would have been straight in there, but I was struggling with portraits. On looking through my portfolio, I found this one that I had completely forgotten about. as i said, I tend to go for grab shots and so, without the planning and preperation that goes with a landscape image, my portraits tend to slip out of my consciousness rapidly. However, I think I did a good job of this
 one. This is my (at the time) 6 year old daughter practicing on the piano while my parents-in-law listened and enjoyed the candles on the Christmas tree. I tried to make this a timeless image by converting to black and white and hiding the existing noise from the high ISO exposure by adding to it with more, to make it grainy and just that little bit less modern. I used the keyboard as the anchor of the image and as a lead in line . The way the light fell on the keyboard lets the eye be grabbed by a bright band of light taking you to my dughters hands. From there the reflection of the trees candles on the black keye gives an interesting contrast and leads you through the room and past my parents-in-law (in soft focus - and with their backs to us as they contemplate the tree - they are there for mood and context, not to be the subject) and on to the distinctive but out of focus tree. The idea here is that the viewer appreciates my daughter playing piano as the subject, but the context of a tranquil Christmas period is evident from the grandparents standing close together, and the glow from the tree in the dim lighting. The three key elements necessary to tell this story are practically all that is visible, each element is appropriately exposed and there is little else to distract the eye. altogether I think this was very successful - we shall see what the judges at NYIP say... Have a look at the other entries too, some are of an exceptionally high standard when you consider that all of us there are students on a journey from the basics to becoming better photographers.
Just for completeness, here is another image that I "grabbed" at last years festival. Unfortunately I can't enter it in any competitions or sell the image as I don't have a model release form. This is a very pretty girl who could not have looked more pensive. I
 t was about 5pm on the last day of the 2008 Edinburgh Festival and I would bet that she is a dancer in one of the shows (after all she was wearing leg warmers Sherlock) - she looked utterly dejected and alone, possibly sad that the excitement of the last few weeks was coming to an end. I was scanning the milling crowds for a good image and my lens happenned to alight on her just as the sun came out for a few seconds and illuminated her perfectly. I reeled off a couple of snaps so that I would not miss the chance and then was able to wait a few seconds without her noticing me till I was able to get this image with all the people crowded round her but passing her by with their backs to her. This really accentuated the mood and makes the image in my opinion.
If you would like to see anymore of my Fringe Festival images, please have a browse at my PBase Fringe gallery. I wonder what this years will bring.
My conclusion from these two images, my two most successful "portraits", is that a portrait must tell a story or evoke an emotion - I see so many portraits of cute kids and beautiful girls but so often, they are just "record" shots, posed and perfect and essentially boooooringggg. For me a good portrait is almost a foray into photo journalism. We shall see if I have the courage to take the final step into that most risky and scary of all photography genres...
Thursday, 6 August 2009
1st August - East lothian and the Borders - St Abbs Head
My 3rd walk in 8 days - it was my turn to come up with a location for a walk so I was delighted when TB said she had never been to St Abbs before. I'd been to the quaint little town but never on the cliff tops. A quick bout of Googling helped me plan a route and get an appreciation for some of the rugged cliffs that could be seen along the way. The route looked fairly flat (which proves just how poor I am at map reading!!!) so I gathered up the big beastie - the 40D plus 3 of my 5 lenses. I was sensible enough to know my limitations however and left the tripod at home.

On this occassion we decided to leave TB's dogs behind - neither of us fancying an exuberant dog louping about at the edge of sea cliffs... In the end I think they would have been fine as the cliff paths are a few meters from the edges and there were only sheep around in one field. We live and learn.
Arriving at St Abbs Nature Reserve car park the first "sight" to see is the coffeee and bun shop, selling the much sought after by Mr MacD, cream teas!! As ever though, I had set off far too late and there was no time to partake - I will have a cream tea on one of these walks, I will!
A gentle slope  on a nature trail path along the main road takes you to the start of the walk. From the path I could already to see what was ahead of us - jagged stacks of rocks, sunshine and hay bales. I had a good feeling about this. Walking away from the road and towards the cliffs we wlaked alongside a high wall, simply covered in yellow lichens and dotted with the less serious walkers pointing their point and shoot cameras at the lichen. When you see "non-photographers" grabbing abstract patterns in lichen it is a very promising sign. At the end of the wall there is a breath taking drop to the see and a rocky bay surrounded by cliffs. My thoughts were already turning to dusk, an ND8 filter, 3o second exposures and blurred waves washing across the crescent of boulders framed by the cliffs. There is definately a decent image to be made there, but today wasn't the day, no tripod and the sun too bright and contrasty. So off we set on the "flat walk" up a 300 yards of fairly steep slope to the top of the cliffs and right up close to the jagged rocky stacks and a fantastic view down to picturesque St Abbs. I left the picture taking for this till later counting on a lower sun and less brightness.
 on a nature trail path along the main road takes you to the start of the walk. From the path I could already to see what was ahead of us - jagged stacks of rocks, sunshine and hay bales. I had a good feeling about this. Walking away from the road and towards the cliffs we wlaked alongside a high wall, simply covered in yellow lichens and dotted with the less serious walkers pointing their point and shoot cameras at the lichen. When you see "non-photographers" grabbing abstract patterns in lichen it is a very promising sign. At the end of the wall there is a breath taking drop to the see and a rocky bay surrounded by cliffs. My thoughts were already turning to dusk, an ND8 filter, 3o second exposures and blurred waves washing across the crescent of boulders framed by the cliffs. There is definately a decent image to be made there, but today wasn't the day, no tripod and the sun too bright and contrasty. So off we set on the "flat walk" up a 300 yards of fairly steep slope to the top of the cliffs and right up close to the jagged rocky stacks and a fantastic view down to picturesque St Abbs. I left the picture taking for this till later counting on a lower sun and less brightness.
Having gained the top it was straight back down again to a rocky bay with some great boulders. With bags of time before the light went we had a wee s cramble about omn the rocks before heading onwards - straight back up a hill. sensing that perhaps I had gotten the degree of difficulty of this walk a tad wrong, we passed on climbing up a 50 degree slope to a rocky ridge and wandered round it, along the flat path through the rural countryside. Finally we came to another climb up to the very high cliff tops and what a view greeted us - coves and inlets back to st Abbs, low cliffs past them, sea as far as we could see and yet another lighthouse, my second in 3 days. A slope up to the lighthouse along the cliff tops had us "bravely" trying to out do the other by edging closer to the sheer drop. I think I won by about 50 cm with my 2 meters to the edge but TB certainly looked more confident and may have done better if I had actually told her we were competing. I am told by my friends that I am pathetically competitive.
 cramble about omn the rocks before heading onwards - straight back up a hill. sensing that perhaps I had gotten the degree of difficulty of this walk a tad wrong, we passed on climbing up a 50 degree slope to a rocky ridge and wandered round it, along the flat path through the rural countryside. Finally we came to another climb up to the very high cliff tops and what a view greeted us - coves and inlets back to st Abbs, low cliffs past them, sea as far as we could see and yet another lighthouse, my second in 3 days. A slope up to the lighthouse along the cliff tops had us "bravely" trying to out do the other by edging closer to the sheer drop. I think I won by about 50 cm with my 2 meters to the edge but TB certainly looked more confident and may have done better if I had actually told her we were competing. I am told by my friends that I am pathetically competitive.
 I snapped a few of the lighthouse and the cliffs but felt that nothing had really grabbed me yet.  But as we rounded the headland to Pettico Wyck suddenly we were faced by bird covered giant seas stacks, slate gray in a bright blue see. Time for the wide angle lens, careful not to photograph my feet, TB was able to have a seat and enjoy the view while I scrambled all over the cliff tops looking for a good angle.
 But as we rounded the headland to Pettico Wyck suddenly we were faced by bird covered giant seas stacks, slate gray in a bright blue see. Time for the wide angle lens, careful not to photograph my feet, TB was able to have a seat and enjoy the view while I scrambled all over the cliff tops looking for a good angle.
Onwards and upwards - actually downwards on this occassion we followed the road down and came across an amazing vista of cliff after cliff receding away into the distance. Now this was the view that needed some attention. Various lenses were tried and some passable images snapped. Unfortunately there were some vehicles on the road ahead spoiling the shot, but no matter, that's what the cloning stamping and patch tools are for! As we moved towards the firts of these cliffs it became obvious what the vehicles were - police vans, ambulances and cars. The area is popular with divers and it seemed that one had gotten in trouble. I had a wrestle wit h my conscience, attach the zoom lens and get some photo journalism practice or be a human being and keep my nose out. In the end I decided I did NOT want to photograph someones misery but I WAS nosey enough to ant to see what was going on. It turned out to be a chap with a broken ankle, which in the grand scheme of things is not that bad. Theer have been some diving fatalities there over the years. I did nearly get my camera out when the police van made a mess of negotiating the sigle track road and kept hitting the fence posts along the side, but my copmpassion for the police officer made me stop myself from giving him extra pressure. His partner did however find it all very amusing. Accident drama aside, this looks to be a very promising location for a sunset, with parking nearby, all be it 2 hours from my house. I think I will be back there soon.
 h my conscience, attach the zoom lens and get some photo journalism practice or be a human being and keep my nose out. In the end I decided I did NOT want to photograph someones misery but I WAS nosey enough to ant to see what was going on. It turned out to be a chap with a broken ankle, which in the grand scheme of things is not that bad. Theer have been some diving fatalities there over the years. I did nearly get my camera out when the police van made a mess of negotiating the sigle track road and kept hitting the fence posts along the side, but my copmpassion for the police officer made me stop myself from giving him extra pressure. His partner did however find it all very amusing. Accident drama aside, this looks to be a very promising location for a sunset, with parking nearby, all be it 2 hours from my house. I think I will be back there soon.
 After satisfying our curiosity, TB and I headed down the hill and along the loch my map had said we would pass. I assume we did pass it but only flashing glimpses between the vegetation confirmed that. To pay me back for my curiosity I managed to fall over on the wet slippy muddy path here, but my pride bounced me back on my feet before TB noticed... or so I thought "...and he's down", she called without even looking round. My main worry was whether my camera was OK or not, but by simply breaking it's fall with myself, it was.
At the far end of the loch there is a small path back up the other side - we darted in here for rest and a view over the loch. TB being a sensible sort had brought some fruit to eat while scoping out future walks in her walking guide book. I busied myself with pictures of a boat house, interesting fences and reflections and some bull rushes. Hmmmm... a classic example of practicallity versus artistic creativity :-) A rested TB and a hungry MacD set off again and within 50 yards found ourselves on the outward path again and walking back to St Abbs, snapping the view over the rock stacks on the way (see above).
A quick pint and a bite to  eat later in St Abbs and we were heading off home in the car. along the way however I remembered how picturesque Cove is, so we popped in for the 30 minute walk through the ancient tunnel and around the old harbour. I'd been togging here before and I'm sure there's a great image of the natural void in the giant rock to be had - I just can't get the right angle!!! It could be cool on a stormy day, perhaps I'll venture down that way again in the winter. Incidentally, here is another shot, from Cove last year - I liked this image and having shot it already last summer, I didn't drag, the by now getting weary, TB round the headland to reprise it (I of course was fresh as a daisy - ahem....).
 eat later in St Abbs and we were heading off home in the car. along the way however I remembered how picturesque Cove is, so we popped in for the 30 minute walk through the ancient tunnel and around the old harbour. I'd been togging here before and I'm sure there's a great image of the natural void in the giant rock to be had - I just can't get the right angle!!! It could be cool on a stormy day, perhaps I'll venture down that way again in the winter. Incidentally, here is another shot, from Cove last year - I liked this image and having shot it already last summer, I didn't drag, the by now getting weary, TB round the headland to reprise it (I of course was fresh as a daisy - ahem....).
 All in all, I felt pretty good at the end of this walking day, my previous hikes had prepared me to be able to tackle the hills without sore legs the next day and it had been an interesting walk with some great photo opportunities on the day, and for the future. A good one to finish with, with Mrs MacD and the mini MacD's returning this week I shall probably not get out and about again for these all day walks for a while, but this week has opened my eyes to the potential of some areas that were previously not far enough away to justify a holiday to, and too far away to drive out to for an hour or or so. But I can see more day long excursions in my future.
Wednesday, 5 August 2009
30th July - East Neuk of Fife, Elie to St Monans
Completely enraptured by the joys of walking, I decided to spend a rare day with my sister by going for a gentler but interesting walk between two picturesque villages in the East Neuk. Starting at that car park at Ruby Bay in Elie, we were immediately able to see Elie lighthouse. It's not the most interesting looking lighthouse but it was duly photographed and added to my collection. I'm an absolute sucker for lighthouses.
With the low evening sun bathing the Lady's Tower in golden rays, I got my "shot of the day" - with a small vertical rock in the bay mirroring the geometry of the tower itself.

Within a couple of hundred yards of the car park we came face to face with the Lady's Tower - a folly built for the local Lady who was a naturist to get her kit off out of the eyelines of the townspeople. we didn't reckon it would be a very comfortable climb down the limpit encrusted rocks for a lady of gentle breeding to attempt in the buff! Sis said it was obviously built by a man. Again photo's were duly taken - unfortunately without the presence of a nudey noble woman. Could be a nice location for a glamour shot though if you are into (have the brass ne ck for) that sort of photography.
 ck for) that sort of photography.
We followed a sheep path down into some high ferns eventually joining a sandy path just above the beach. This walk takes you past a 13th and a 15th century set of ruins. Unfortunately the first is buried in the vegetation and the second is covered in scaffolding/fencing so not many togging opportunities. After a slow stroll we ended up in St Monans and while we dissapointingly couldn't find anywhere that sold cream teas, we were able to get tablet, icecream and drinks and took a time out stuffing our faces on a hill, looking down on the pretty new St Monans Church. I have ancesters who lived in St Monans in the early 1800's, and aged 16, they ran away to Edinburgh to get married. There is a special mention of them in the church records.

The walk back was exactly the way we had arrived, the difference being that it was evening, the light was great and the shore birds were active before roosting time with oyster catchers, sand pipers and curlews fairly close by and feeding.
With the low evening sun bathing the Lady's Tower in golden rays, I got my "shot of the day" - with a small vertical rock in the bay mirroring the geometry of the tower itself.
This was a fairly interesting walk for twitchers and gentle enough to take the kids on. With expansive beaches to play on it yells "PICNIC".
Monday, 3 August 2009
25th July - The Trossachs - Rob Roys Grave to Irishmans Loch
My old pal TB and I have been talking about doing this walk for about a year. She knows it well and promised me some jaw dropping scenery. With a free weekend for us both, finally it was time to pull on the hikies. I was promised quite an arduous walk and it's been a few years since I last walked seriously in the hills, so the 40D was left at home and the lightweight S3 IS was slung over my shoulder. Camera batteries charge, SD card emptied, car filled with petrol and TB's english bull terriers safely stowed in the back, off we went to the Trossachs, via the longest traffic jam we could find. TIP, avoid Callendar during the Callendar Highland Games.
We stocked up with bottles of water and tablet and began our walk from Rob Roys Grave at Balquhidder Kirk. The first part of the walk was a fairly gentle but steady climb into the foot hills along an easy well defined forest road, but a few drinks for TB the night before and a pathetic 3 hours sleep for me had us both looking alarmingly knackered - luckily the dogs dragged us up the hill, strong wee beasts that they are. The road levelled out and were able to enjoy the scenery as we strolled along the glen, while TB tried to teach me how to control her boisterous terriers - I was finding that more physically demanding than the walk by this stage. After about an hour we had covered the first 2 miles or so of the walk and, about to part company with the road, we were at the bottom of a scramble up through the heather (blooming purple and looking decidely photogenic, although I just didn't do it justice with the S3).
A handy bench allowed us to stop and let the dogs rest (ahem). We had a drink and the tablet while they "rested" by running around and begging sweets off us. Off we set again up the steep rocky path through the heather, stopping to put the dogs on leashes when we got to sheep territory. Hangovers and sleepiness were behind us now (isn't fresh air wonderous) but the path was hard going and called for regular rests. Eventually we came to a rickity wee stile and had the pleasure of lifting 2 three stone english bull terriers over the fence - hefty! Just beyond the style the ground became open and we had the choice of various sheep paths up around a rocky knoll. This was easily the toughest part and at one point I was hoping TB would consider it too tough and say that she had had enough. Not a chance - unfortunately she was looking a bit too fresh and I had to just soldier on. But it was worth it. Cresting the hill I was looking back at where we had come from when I noticed TB had gone quiet - she was waiting for me to notice Irishmans Loch, right in front of me - "Wow" was about all I could rasp out as I tried to avoid the coronory. The most placid looking sizable tarn stood on front of me, the reflection of an enormous rocky stack mirroring off it. Looking up at the stack we both saw an incredibly huge bird wheeling round - my suspicion is that it was a sea eagle, and the wind dropped to nothing as we stood in the lea of the stack. Fish rose to ripple the surface
  and the dogs decided it was swimming time. What an idyllic spot! We sat and rested by the bank of the lochan, and snapped some pics of the dogs playing in the water. What fun they had, wading about, coming over and shaking themselves next to us or trying to sit on us with their wet fur.
We had a stroll about the summit and all the way around the lochan spotting various great angles for photography and I wished I had my tripod. An HDR of the cliff face would have been superb. 3 hours since we had left Rob Roy, we headed back down, past a boulder the size of a house that had fallen out of the stack - we could see the gap where it had once hung and eventually joined up with the path we had taken up.
This was a superb walk, about 5 miles and it took us 5 hours of ambling, togging and picnicking. Beautiful. To make it even better we discovered a fantastic pub - the Rob Roy Inn, where we had an interesting chat with a couple of shepherds over some surprisingly sophisticated but cheap food. That was it, I had the walking bug again!
We stocked up with bottles of water and tablet and began our walk from Rob Roys Grave at Balquhidder Kirk. The first part of the walk was a fairly gentle but steady climb into the foot hills along an easy well defined forest road, but a few drinks for TB the night before and a pathetic 3 hours sleep for me had us both looking alarmingly knackered - luckily the dogs dragged us up the hill, strong wee beasts that they are. The road levelled out and were able to enjoy the scenery as we strolled along the glen, while TB tried to teach me how to control her
 boisterous terriers - I was finding that more physically demanding than the walk by this stage. After about an hour we had covered the first 2 miles or so of the walk and, about to part company with the road, we were at the bottom of a scramble up through the heather (blooming purple and looking decidely photogenic, although I just didn't do it justice with the S3).
A handy bench allowed us to stop and let the dogs rest (ahem). We had a drink and the tablet while they "rested" by running around and begging sweets off us. Off we set again up the steep rocky path through the heather,
 stopping to put the dogs on leashes when we got to sheep territory. Hangovers and sleepiness were behind us now (isn't fresh air wonderous) but the path was hard going and called for regular rests. Eventually we came to a rickity wee stile and had the pleasure of lifting 2 three stone english bull terriers over the fence - hefty! Just beyond the style the ground became open and we had the choice of various sheep paths up around a rocky knoll. This was easily the toughest part and at one point I was hoping TB would consider it too tough and say that she had had enough. Not a chance - unfortunately she was looking a bit too fresh and I had to just soldier on. But it was worth it. Cresting the hill I was looking back at where we had come from when I noticed TB had gone quiet - she was waiting for me to notice Irishmans Loch, right in front of me - "Wow" was about all I could rasp out as I tried to avoid the coronory. The most placid looking sizable tarn stood on front of me, the reflection of an enormous rocky stack mirroring off it. Looking up at the stack we both saw an incredibly huge bird wheeling round - my suspicion is that it was a sea eagle, and the wind dropped to nothing as we stood in the lea of the stack. Fish rose to ripple the surface
  and the dogs decided it was swimming time. What an idyllic spot! We sat and rested by the bank of the lochan, and snapped some pics of the dogs playing in the water. What fun they had, wading about, coming over and shaking themselves next to us or trying to sit on us with their wet fur.
We had a stroll about the summit and all the way around the lochan spotting various great angles for photography and I wished I had my tripod. An HDR of the cliff face would have been superb. 3 hours since we had left Rob Roy, we headed back down, past a boulder the size of a house that had fallen out of the stack - we could see the gap where it had once hung and eventually joined up with the path we had taken up.
This was a superb walk, about 5 miles and it took us 5 hours of ambling, togging and picnicking. Beautiful. To make it even better we discovered a fantastic pub - the Rob Roy Inn, where we had an interesting chat with a couple of shepherds over some surprisingly sophisticated but cheap food. That was it, I had the walking bug again!
Sunday, 2 August 2009
Driven to Walk
How do you get to your locations? I know that the likes of Richard Childs and some of the other big hitters in the photography world will think nothing of climbing a mountain in the dark or camping overnight at a summit, just to get that 10 minutes of golden time when the sun rises. I however am a little more leisurely in my approach. I don't have all day to go togging generally. What I get is a couple of hours to get on location snap away like fury and get home in time for tea with the family. So I drive. I drive to the location, I park on a grassy verge, or halfway into a field or in a layby or passing place and then I rush out, unfolding my tripod as I go, walk maybe 100 yeards, snap away and get back in the car to get to the next location half a mile away. It's not ideal, but needs must.
Recently I had the chance to pick up an old hobby from my youth - hill walking. But now I was walking with a big Lowepro camera bag over my shoulder and keeping my eye out for a great composition. Unfortunately I'm not fit enough to carry my heavy but stable tripod too, so everything has had to be a short exposure, well lit and hand held. But what a benefit. To get out to the wild places, to see the less frequently photographed sites, to get to the sort of rugged areas that cars simply cannot, you HAVE to get out and walk. Cycling wont do either, you zoom by too fast. With walking you get the time to spot compositions and you are mobile enough to make a picture by adjusting your position. I was guilty of having gotten too lazy and had neglected this completely in recent years.
So over the last couple of weeks, with my wife and family away on holiday and me left with time on my hands,I have been out on 3 seperate 5 mile hikes in 8 days - and what locations!!! The Trossachs, the East Neuk of Fife, St Abbs Head. All glorious, I've even been lucky with the weather!
Having found these great locations, now I want to be there for sunset, I want the tripod so I can make a 30 second exposure. The great thing about being on your feet is you can climb to higher ground and spot the tiny roads that go to the best views. At St Abbs, I found a great location and I also found a road to get me there. It is a road I thought would be private and would never have gone up, now I know differently. In Fife, I found some great bays that are within half a mile of a car park - if I had not gone there to walk, I would never have known they existed.
So now I use the best of both worlds. I use the car to get me to walking locations. I use my feet to scout out great compositions and routes to get to them, and having timed the routes I can use the car to get back there again at the right time of day for a dramatic shot.
Wednesday, 1 July 2009
Heavy Metal!
Last night I went to see AC/DC at Hampden - it rocked!
I thought about taking my SLR with me, with my biggest zoom and image stabalization (IS) but it was simply to big, heavy and bulky, I was worried it could get broken and I'd probably lose it in the pub before the gig! So time to fall back to my S3 IS hybrid with the 18x mega zoom... Nope, just that little bit too big and lets face it I'd have bashed it jumping around saluting Angus and the boys and headbanging (yes really - I guess I got caught up in the moment). I needed a little pocket sized point and shoot or a great camera phone, neither of which I own.
Instead I snapped away with my old 1mp camera phone. Everything came out blurred and badly exposed, exactly as I had feared. Luckily one of my "metal mates" had a more modern phone and grabbed a few snaps.
 This has brought it home to me that a) any image is better than no image and b) there is a definate use for point and shoot cameras, particularly now that the price is coming down and the quality is going up. Let's face it a standard new lens cost between £300-£500, an L lens can be 10 x as much. A good point and shoot can be bought for under £150... There are many pros that use point and shoots nowadays to get candid shots, to photograph celebs and across police lines, where perhaps a pro shooter have have trouble getting access.
I'd been wondering which bit of kit to buy next, a remote flash, a flash trigger, a 70-200mm L lens, a lighter tripod, the list goes on. I think I know now, it's going to have to be a quality compact point and shoot. And it will go EVERYWHERE with me!
I thought about taking my SLR with me, with my biggest zoom and image stabalization (IS) but it was simply to big, heavy and bulky, I was worried it could get broken and I'd probably lose it in the pub before the gig! So time to fall back to my S3 IS hybrid with the 18x mega zoom... Nope, just that little bit too big and lets face it I'd have bashed it jumping around saluting Angus and the boys and headbanging (yes really - I guess I got caught up in the moment). I needed a little pocket sized point and shoot or a great camera phone, neither of which I own.
Instead I snapped away with my old 1mp camera phone. Everything came out blurred and badly exposed, exactly as I had feared. Luckily one of my "metal mates" had a more modern phone and grabbed a few snaps.
This has brought it home to me that a) any image is better than no image and b) there is a definate use for point and shoot cameras, particularly now that the price is coming down and the quality is going up. Let's face it a standard new lens cost between £300-£500, an L lens can be 10 x as much. A good point and shoot can be bought for under £150... There are many pros that use point and shoots nowadays to get candid shots, to photograph celebs and across police lines, where perhaps a pro shooter have have trouble getting access.I'd been wondering which bit of kit to buy next, a remote flash, a flash trigger, a 70-200mm L lens, a lighter tripod, the list goes on. I think I know now, it's going to have to be a quality compact point and shoot. And it will go EVERYWHERE with me!
Thursday, 18 June 2009
Motion
I sat on the train today, sweeping through the rural landscape and watched gusts of wind ripple the heads of the cereal crops in waves across the fields. I find that motion fascinating. So how do you use "still" photography to capture motion. A familiar topic this for anyone sitting the New York Institute of Photography course!
There are three ways (at least) of expressing motion.
1) Stop the motion - catch something that obviously is moving fast at the most "obviously moving" part of its motion eg a ball at the top of it's bounce or a gymnast in the air. I use this in my sports photography - ball in the air, feet off the ground. It's literal and this is the sort of things newspapers want.
2) Panning - now this is fun! But it can be difficult. You need a slowish shutter speed and you need to move the camera at the same speed as the subject. This way the subject is clear and in focus but you get a directional blur in the direction of movement. The difficult part is matching your pan speed to be exactly that of the subject -it takes practice!

3) Slow shutter speed to express motion - I find this the most rewarding. Here is an example of how (last year) I tried to show the rippling, swaying effect of the wind on the crops. I didn't quite get the feeling from this image that I was after, but I think it does illustrate the sway and I find it interesting and a good example of using shutter speeds to give a creative interpretation.
If you've some good examples of expressive motion, please comment with a link!
Wednesday, 17 June 2009
Family Snaps
So, what is the line between a family snap and a fine art print?
Today was my daughters 5th birthday and I snapped away merrily as she opened her gifts and had a whale of a time. But still I couldn't help myself, I put a wide angle lens on and shot up from the floor, I experimented with flash and with natural light, I missed a shot and asked her to pick the toy up again and look happy. What I didn't do was to sit back and relax and enjoy her happiness... I had planned to, but my wife asked for one picture and I was off.
So often on holiday, we stop the car to get a shot or we go to places because I know there will be something "worth" photographing and always, always, I am hoping to get the fine art shot that will make me proud of myself.

When I shake off the pretensious photographer/artist that lives in my head I feel guilty if I've just snapped a picture and often I'm too embarressed at the poor quality to ever show anyone the results. This worries me. Photography should be fun and I have started to resent taking record shots of family happy times because they are not artistic enough. What should I do?
Well, I have changed my workflow. I now take my art shots and save them as RAW, save the converted jpg and then save the processed image of the best ones - these go in my portfolio. The family snaps are saved only to jpeg and go in a family album. By making a distinction and seperating my fields of photography I can relax and enjoy each style for what it is.
So, what IS the line between a family snap and a fine art print? In my book it's all to do with how much thought I put into the shot and ultimately which folder it ends up in on my PC.
Tuesday, 16 June 2009
How to Get Inspired...

Look at the light! There are dark moody clouds, sunbeams and a magical glow, all I've got to do is find a subject...
For a couple of years I've been trawling around the Bathgate Hills in West Lothian to carry out my landscape photography - I think I've pretty much shot everything now and frankly it's becoming stale. So when I see great light I get dejected as there's nothing new to shoot!
Last weekend however, I trudged off to the car with my whole set of kit and went for a drive. The roads up there are often single track and as ever, I had to pull into a lay by to let a tractor past. As I waited, my eye's fell onto the verge side plants...hmmmm.... Out I got, macro lens attached to my 40D, and started snapping. before I knew it I had taken 30 shots in 20 minutes. there were tons of subjects and I was having a great time. I spent the next 2 hours driving from lay by to lay by, shooting everything within 20 yards of the car. As I did so I started to look up and see shots that I had not noticed before. Now, like 2 years ago, I can't wait top get back up into the Bathgate Hills again.
Monday, 15 June 2009
Summer, summer, summer

Summer is here - What better time to start a blog? Well, in Scotland , early summer can mean humid conditions, lush greens in the trees, inky blue clouds and frequent downpours. so here is a picture that "feels" like summer to me. Taken in my parents garden yesterday after a lovely dinner of pork cutlets and roast potatoes - yummy!
Flower and plant photography has never been something to light my fire, but as I am progressing in my skills as a photographer I am finding that everything is becoming an interesting subject to me. This change of attitude has opened up a new world to me and revitalised a few of my old photography locations. More on that shortly!
Subscribe to:
Posts (Atom)


