- Set up the tripod, compose your image carefully, everything will be visible in the final image so pay attention to everything in the frame, whether it is shadow or not.
- Set a small aperture and focus close by (perhaps even use hyperfocal depth of field). You want everything to be adequately in focus.
- Expose for the mid tones or just let the camera automatically set the exposure
- Lock your exposure and focal setting (you could just use manual for this)
- Digital camears wil allow you to adjust the exposure by 1/3rd of a stop increments to a maximum of 2 stops dark and 2 stops light This is normally represented as the bar across the botton of the viewfinder that looks like \...\...\...\...\...\...\ and is called exposure compensation (look up you camera manual if this is news to you). Set the camera to the darkest of these settings and take the image. It will be pretty black but the brightest highlights will have been captured without being burned out.
- Do NOT move the camera or tripod, but adjust the exposure compensation brighter by 2/3rds of a stop and retake.
- Repeat this until you are at the brightest setting and everyth
 ing is burnt out except the darkest shadows, which should now be exposed well.
 - You should now have 6 or 7 images of varying exposures. Load them to your PC.
- Now you need to use some special but fairly cheap HDR software. I have found Photomatix to be very easy to use. Load all 7 exposures to the software where they will be blended.

You can adjust the relative exposures and contrasts in the software. My tip is to try to make things look natural, do not overdo it or it will be painfully obvious.
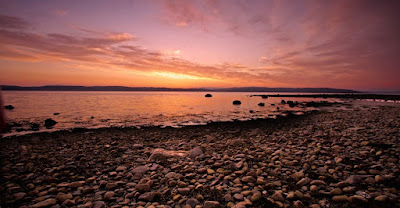
That's it you now have an image where EVERY element is exposed correctly, he colours will be fairly rich and you should have a high impact image. Import it to photoshop to carry out any fine tuning, cloning, dodging and burning as necessary, like you would with any image. What makes a great HDR image? Well each to their own, but here is one I think is not overdone but I just could not have done without this technique.
Also remember that while most HDR's tend to be supersaturated, this image technique can be used with muted colours and even mono's - it's about the exposures, not the colours.


No comments:
Post a Comment