Well I didn't do so well at the portrait competition - only the top 3 were announced, and I didn't place and got no comments back - so I guess it's up to you guys if I am going to get any feedback on these. Never mind, chalk it up to experience.
This weeks NYIP challenge is macro photography. I have a macro lens and I enjoy using it but I'm still at the stage of "Wow! Look how close I can get!" rather than trying to compose fantastic artistic shots - at least I am aware of this however and trying to do something about it. Here is my entry to the competition. I think it holds its own but it got me thinking - what makes a good macro shot?
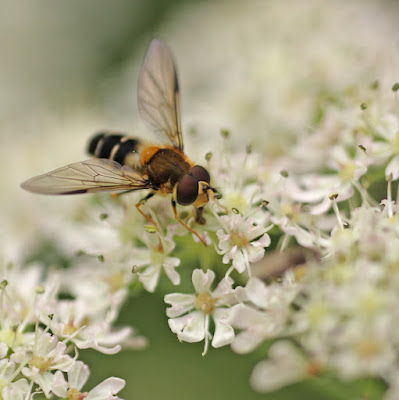
I wish I'd researched this before I entered my competition, but there is what I've learned. First of all, depth of field is all important. You want to blur out the background with some pleasing
bokeh but you must keep the subject in focus. Many less accomplished macro toggers (including myself as you can see by this image) use a shallow DoF and end up blurring part of the subject unintentionally (of course some blurring can be good for the more "arty" shots, I actually like the way the attention is brought to the head of this hover fly by lightly blurring the tail). using a wide DoF, by closing the aperture (ie a big numbered "f stop" value) gives stunning images. Check out
Mr Plonsky's images for examples of how to do this, without using expensive equipment.
As well as getting the right DoF for your shot, for this type of shot the most important thing is getting the focus bang on, and with absolutely no camera shake. So, how do you do this - simple, use a tripod!...Hang on... by the time my tripod is set up the bee will have flown off (terribly restless critters, bees). Here's my method, I only take macros on well lit days, or I use a flash with a big zoom. Because you are using fast speeds to prevent shake and probably low ISO numbers to preserve the detail, because the light is cut down by your sheer proximity to the subject, and because many people use a long lens close up to help increase the bokeh behind the subject, light is always a difficulty with macro photography. Using flash is problematic, most macro images are taken from inches rather than feet away, so the subject can be washed out by the flash. I tend to stick to bright days. I set the shutter speed as fast as I can (minimum 1/250th if possible on a 70mm prime lens - this is about 3 x faster than you normally need to take a picture hand held with this lens), I set my focus manually (lock it if you like) and then I brace myself as best I can (feet apart like on a surf board, elbows tucked into my chest and stomach, take a breath in and hold it) and make a tiny rocking motion so the subject slides in and out of focus. Half depress the shutter, then I rely on my lightening fast reactions and take many exposures in case I got it wrong. It's a little hit or miss but it means you can move to a new position quickly and follow that bee!
There are other methods for taking images of tricky moving subjects, one's which I have heard of but do NOT approve of, these are killing an insect and then taking it's picture, catching an insect and putting it in the freezer to make it sluggish... there are more sculduggerous methods but frankly, I think they are not only cruel but also cheating. The fun for me is in getting the photograph just right, under difficult conditions.
An alternative method of focussing better is to take multiple exposures and blend them in Photoshop. Just like they said on "Blue Peter", here is one I prepared earlier of a white cross spider.

Note that this is from two shots, carefully lined up in Photoshop, one where the head is in focus and the other where the thorax is in focus. It's not perfect but is good enough for web publishing. This is a tricky bit of post processing, personally I find it difficult but you can get software that will blend this for you in a similar method to that of HDR photography. It would probably just have been easier to have used a narrower aperture but I liked the reflection of light to the left, blurred by the narrow DoF.
So that's the technical aspect of macro photography. We've still to cover the artisic nuances. You'll be glad to hear that these differ very little from any other type of snapping. You need to pay attention to the usual rules of composition, simplify, draw attention to the subject and understand what you are taking and what you are trying to achieve. Use rules of thirds, lead in lines etc.
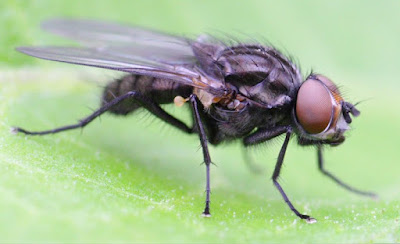
The main thing that macro pics give that others don't is a very unusual angle - a view of something you don't often see. Make use of that. Make the subject the parts of something that are normally invisible to the naked eye - this gives the "Wow!" factor. Did you know that flies have hairs at the the junctions of their compound eyes. I didn't! I had no idea just how hairy flies are!
Finally, like all photography, telling a story gives an image a memorable hook. How much better would the images above be if say the spider was about to catch the fly! I like my first image here, of the hover fly as it is in context, on a flower and it's "tongue" is actually out in contact with the flower it is sitting on.
So in summary, here are the things that IMHO make a great macro image (and if I ever take one that ticks all the boxes, I'll let you know!):
1. Suitable Depth of Field
2. Pleasing bokeh
3. Pinsharp focus, especially on the eyes.
4. Composition - rules of thirds, leading lines, repeating patterns etc.
5. Attention to the lighting
6. Novelty ie the detail we don't normally see
7. A story.
In other words, many of the things I look for in any photographic medium. The tricky bit in macro photography is that many of these factors have to be that bit more precise and are that bit more difficult to achieve.
If you have not tried macro photography, give it a go. Not only does it open a whole new realm of subject matter but practice at photography with these fine tolerances, with this attention to the technicalities of photography, will make you a more accomplished photographer across the full spectrum of styles and subjects.
Before I close this post - here are some great examples of what can be done - contrary to my examples above you don't HAVE to only take pictures of hairy wee beasties:
25 amazing macro shots50 more very cool shots
 ing is burnt out except the darkest shadows, which should now be exposed well.


