Saturday 5 September 2015

The First Rule of Post Processing

Preamble and a bit of a rant
People often ask photographers if they Post Process (that is, use a computer to alter their images). I find this a bit of a nonsense question - if you use a digital camera, you are using ac omputer to see an image. Nowadays the computer does the same as the lab did in the days of film ie it takes the negative (your RAW file) and turns it into a print (or a digital image to look at on a computer -usually a jpg). Even if you don't use a computer the camera turns its code into a jpg and makes choices on your behalf about contrast and saturation etc. So, we all post process, consciously or unconsciously. The question should really be "How much do you post process?". Personally my answer is that I take out movable objects (like litter and cars) but not immovable objects (like trees and buildings). Everything else I do, are simple developing decisions that mirror a traditional chemical lab darkroom. My PC is my darkroom.

Now, the blog post... HOW do you post process?
Which is a difficult question to answer with a mouthful of bacon and brie ciabatta. Every now and then I have lunch with a togging pal (we'll call him David, as that's his name) and we shoot the breeze on just about every aspect of photography you can think of.

Today's lunch , aside from being very tasty, covered film photography, shooting with instamatics to gauge your non digital skill levels, reprocity failure, chromatic aberration (the purple fringey things) and the value of motion blur in dynamic images. Oh yes, and how to digitally enhance dog fur. Interesting and varied chats we have.

Then David, who is a purist, but is starting to grasp the Lightroom nettle, asked about my (is it really?) 8 years of Photoshop experience. He asked how to process images. Talk about an open question! But at that point I was being careful not to spill gorgonzola and broccoli soup down my front and replied in a fairly non committal manner - a sort of soup filtered grunt. But it's a good question and post ciabatta and soup and post my day job office hours, I've had time to consider. And the answer is another question (or at least starts that way). The real question is "WHY do you post process" - only by asking that, can you decide HOW you will do it.

Landscapes are my passion (David likes to photograph lumps of metal birling round a wee road, I don't really know why) so I'll tell you why I typically post process a scenic image. Simply, I want to give the 2 dimensional image the same 3 dimensional feeling that I got when I took it. This means it needs something that a print or screen can't give - depth. I need to optically provide the depth of miles on a canvas that's microns thick. I've drawn a wee diagram to illustrate how ( I like diagrams even more than bacon and brie - I guess I'm a visual learner). 


I trained as a designer, so have had a tiny grounding in painting and drawing, which comes in very handy here. One of the things that you learn when you paint is that close items have very different properties to distant objects. First off, they are more vibrant, clearer and with more contrast. Now that doesn't mean you should go nuts and over saturate the foreground, but a subtle effect is to raise the saturation a little and then concentrate on the background which you can mute a little, maybe even let it fall out of focus a bit. Overall you get a subtle, but effective, feeling of depth.. 
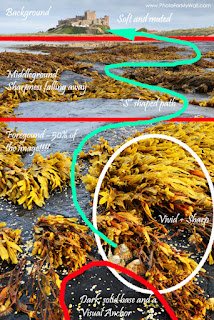
Here's an example (finished image at the bottom of this post) - click on it to see it larger, but the explanation is... really sharp, colourful high contrast limpits and seaweed (yes it actually was that colour - I haven't exaggerated it), an interesting fairly sharp but muted middle-ground and a softer less contrasty background that happens to be quite interesting too (so the viewer looks from front to back. You might notice that I even ensured there was a "visual path" from limpits to castle, using the contrast between sea weed and dark grey rock) - lots of depth!  Note that the sharpness and it's "fall off " were achieved "in-camera", but it would be just as easy (easier?) to do this in post processing. To improve the picture it needs some emotion or a story too, but unfortunately there was no ravenous seagull handy that I could persuade to engage in a life or death struggle with the limpits. I guess lapping water may have been a more mundane "story" though.

I'll not get too technical here but the basics are as follows - if you need advice, feel free to mail me at PhotoForMyWall@gmail.com. 

To locally change  the saturation, you can mask the rest of the image and boost saturation, or select the bit you want and saturate it. Or increase vibrance. Or lift the exposure and increase the contrast a bit. Combine this with a few other wee tricks and your landscapes can really start to pop! The point is though, that there are many ways to increase depth, and within Photoshop there are a gazillion ways of doing any particular effect. So "how do you Photoshop?". Well decide what you want to do, look up You Tube, read Scott Kelby's books, ask friends, there are many ways. But answer that first question quickly, "why process?", ...before the soup goes cold.

Sunday 5 April 2015

The Best Way to Improve?

So you can take a decent photograph, but how do you move up a level?

There is one single thing that can really improve your photography - here it is. Good quality, honest feedback.

But be warned if you take offence, make excuses, find yourself saying "ah, but that's because", or if you think people don't know what they are talking about, you won't benefit from this. Every bit of feedback is valid if it's honest because photography is about 2 things
1) whether you like your image;
2) whether others like your image.
I'm guessing if you are letting others see them, then you've nailed the first of these. The hard one though is getting others to see an image they way you saw it.

Every picture we take, we are invested in to some degree - because it was difficult conditions, we had to walk a long way, we were in danger when taking it, it carries memories and emotions. And so, instantly we cease to be able to remain objective.

Here is an image I am fairly proud of - it was a grab shot, street scene, outside my comfort zone and style, taken in really difficult lighting, on the spur of the moment, while reacting very quickly to a changing scene. And I was very pleased with it! I was seduced by the edge lighting by a setting sun , the architecture, the subject and how clever I had been spotting this, and being able to react to it in time. But, it never does well in competitions and I didn't know why.


By getting strangers to tell us about our images, we finally start to see what is strong and what is weak in our images, and only by doing that do we learn. But it's not easy to get people to be open and honest - generally people don't want to hurt our feelings. It was for this reason that I started a group within the New York Institute of Photography's forums called "Rhino Hide" - for those with thick skin ie you didn't need to worry about offence being taken - all members were aware of what was coming at them and critics could let RIP! The only rules were that you had to post your own work too, you had to say at least ONE positive thing and some  constructive things, and you had to back up your opinions with reasons. The group was surprisingly popular (although with the passage of time it seems to have ceased to be public and has also softened up a bit now).

Where do you get good critique, if you don't want to start up a group? Well, here are a few thoughts:
1) Enter competitions where feedback is given (not just a score) - camera clubs are good for this.
2) Post images online (but it's hard to get comments that go beyond "nice", so choose where you post carefully
3) Join forums for industry peers - I am a member of a few linked in groups - you can get some great feedback there if you just ask people what is wrong with an image, not if they like it.
4) Take your images to a gallery or a pro togger and ask their advice on how to improve.
5) and of course, send me a message, I'm happy to tell you my opinion - I'm honest but gentle!

The key to this is to respect everyone's opinion, ask for their advice, consider the responses in an emotionally detached way and then, and this is key, make a decision on whether to take advice or reject it - you cannot please everyone and it is still YOUR image.

Here is the result of feedback that I got on LinkedIn for the Urban Florist - I was advised to crop out the foreground, remove the pillar growing out his head, make him less shadowy, boost the brightness of the plants he is carrying and reduce the brightness of the road. The florist needed to be bigger in the frame too. There was other advice too, but this was the stuff that hit a chord with me when I considered it objectively. I don't "remove" items in Photoshop, it's against my personal code, but I certainly could make that pillar a little darker and remove the contrast of it from it's surroundings, which has the same effect without compromising the integrity of the image.


What do you think, did all this improve the image? I think so (or I wouldn't have done it - the feedback is there to be taken or ignored) . I'm grateful for the feedback, the image is hanging in my living room, I'm invested in the memory of taking it, but by listening without taking offense or being overly protective of my image, I now have a stronger picture, and I have learned a few things to consider for next time.


Saturday 27 December 2014

The Landscape Toggers App Toolkit

I'm often asked how I manage to be so lucky, getting on location at the right times of day to capture nice light or interesting weather. There are a couple of factors in this - one is blind luck (which is the single most important thing for a photographer to have - but you CAN make your own!), another is being prepared with
the right equipment in the bag, ready and waiting. But mostly, getting good light and all the other elements of a landscape photograph line up, comes down to planning. I actually enjoy planning. I'm a list writing, bullet pointing, checklist ticking sort of guy. And I love maps.  So this post is about the tools I use to carry out my planning.

1) Subject - what to take. Well, I'm a landscaper, specialising in coasts. So I need a dramatic stage, preferably with something arrestingly exciting in the middle of it, like a lighthouse, a sea stack, or the promise of wildlife. Sometimes the stage itself is enough, if the light and the weather are exceptional . 
You can always look at Flickr or 500px to see what others are photographing but, to find your "own" locations, there is no better tool I know of than Google Earth , which you can use on your PC or tablet. The iPad App is great and I spend many a happy hour browsing on it. Best of all you can see photographs of the locations actually on the maps if a bit of coastline looks promising.

 2) Composition. Yup, before I even know where I'm going, this is being thought about. Nearly every bit of land in the UK has been photographed and posted to the internet. Once I know where I am going, I google it, look up flickr or 500px or PBASE or other photographers web sites and try to see it from every angle possible. And all these sites have iPad apps too! I start to get ideas of what worked well for others, what suits my vision and my style the best, and I try to work out what would make the images better or would put my "stamp" on it.  If I can't imagine taking a better picture than I've seen on the internet I generally abandon that location and look for another - there's little point in just copying an image. So how do you improve on what you find on the net? As well as the angle of approach and composition, I consider weather, time of day/time of year, exposure length, exposing to the left or the right, tide for seascapes. And guess what, there are apps and sites to help with all of these too!

3) The weather. There are so many apps that tell you the weather, wherever you are in the world. The key though is to consult a few of these and try to find some sort of concensus - it's amazing how often they differ. When the align, that's the best chance you have. I use the Met Office's app and a number of others, but a really important one if you are going u into the mountains is the Mountain Weather Information Service (MWIS) . Mountain weather can be very different to weather at more inhabitable altitudes and this is a great site. I also tend to check webcams  - there are more and more of these. A good example is the web cam at the Kings House, which looks out across the Buachaille and lets you see if there is a clear road to get there, but still enough snow on the mountains for good images.

4) The light. There's really only one app I'm aware of that fits the bill perfectly - the Photographers Ephemeris. Sadly no longer available on a PC, it has gone wholly mobile on Android or Apple devices,  and is no longer free. It's about a fiver, but totally worth it. This is the key landscape photographers tool. It lets you find anywhere in the world and stick a pin in it. It then tells you the direction of sun and moonlight at any given time at that particular location and you can plan shoots for any time in the future. It's simply an amazing app and to me, indispensable.  It'll save you a lot of wasted journeys and will get you in position at the right time. As you can tell, I like it.

If you'd like a free app that just simply tells you sunrise and sunset times I use "Sunrise Sunset Free" from the Apple App Store. The nice thing about this app is that it also tells you when there will be pre-dawn light and post-sunset light - the "blue hour". All very useful when trying to work out how obscenely early you will have to wake up and get going. I use these two apps in conjunction with Google maps which tells me how long a journey will take to get on location My best tip here is to get there early. If you arrive int he dark, it will ALWAYS take you longer to find your composition and get set up than you expect.

5) Tides. OK, this is a serious one - you might get good shots with this but more importantly this can keep you safe if you use it right. If you take shots at the coast, you will at some point end up with wet feet, but what you don't want is to be stranded on a rock or in a cave. Much badness. Always check the tide, especially if you are going to arrive or leave in the dark - it's so easy to focus through the lens and not notice that you are being cut off, while you fiddle with apertures and filters. There are warnings on tides at many popular locations, but for the remote ones use an app. There are lots of these too, but the one I use and have found to be reliable is the TidesPlanner app. It does what it says on the tin.

This picture on the right, shows a shot that is only available a) when the tide is on the way in, b) when the tide is at this height, at dawn, and c) when the dawn is over mountains to the left (just out of shot) - A lot of patient repeat visits to remote locations can be avoided by using these apps in combination with each other.

6) Depth of Field - yep there's even an app for this. You may have heard of hyperfocal depth of field - basically for every aperture setting and camera combination, there is a particular distance at which you can focus at that will maximise the depth of field - so sometimes you can actually get a better quality of detail on your image at f/8 than you would have at f/22. All you have to do is find the hyperfocal distance (the point where you should focus).

There are really complex formulae for finding this, and there are tables you can print, so long as you know the crop factor of your sensor (still with me?)...or... you can use an app which will work it out for you. I use avs-soft.com's iDof Calculator eg it tells me that with my 24mm lens, so long as I focus 2.5 metres away, then any foreground as close as 124cm will be in focus and so will everything to the horizon - wonderful! Everything in focus, no lens diffraction from using too small an aperture, and 1 minute taken to look it up.  And if you are uncertain if it's working or not, just hit the DoF button on your camera to check it out.

This picture  looks sharp enough doesn't it? It was taken in relatively low light and I wanted to "freeze" the spray of the sea against the rocks but I also wanted it to be sharp front to back, from about 2 metres away. So  I needed to maximise the light getting into the camera. Up went the ISO to ISO 800 (anything higher would have been too grainy on my old 40D camera). But it was still far too slow. By making the aperture larger from f/22 to f/9, I was able to squeeze out a 1/40s shutter speed and get the shot I was after.


There are lots of great apps out there - I am not affiliated to any of the apps and programs mentioned above and don't take responsibility for their accuracy - I just use them a lot. I've used others, but these are the ones I prefer. If you have any that you use, why not share them here on this page.